
Using Alamofire, AlamofireImage, and SwiftyJSON to download images and fetch data from IMDB

In the previous blog post: “Want your Swift app to scroll in two directions, like Netflix? Here’s how”, a reader named Melvin asks how to add pictures to each cell. Although this question is simple, the solution is rather complicated. Adding images to each cell involves making API calls to a service, fetching image URLs, and downloading / caching images.
We covered the topic of making network calls in this other blog post: 4 Essential Swift Networking Tools for Working with REST APIs. Alamofire and Swift have been changing at a furious pace, so that post could use an update. In the meantime, I figured a useful topic would be to integrate some network calls into the Netflix-style two-directional scroller, using the latest version of Alamofire and SwiftyJSON.
This is a quick and dirty post, so I’m going to move quickly and go very light on the explanation.
Project Information
For your starting point, download the project from the master branch of the git repo.
If you want to skip to the end, pull the project from the melvin branch.
Setting up External Libraries
We’re going to need a few popular libraries that will perform the heavy lifting. You’ll need to first setup the Carthage dependency manager.
Note: You could also use CocoaPods or git submodules — it depends on your project and the team you’re working with.
1. Update Brew
On the command-line, update Brew and install Carthage:
brew update && brew doctor && brew install carthage
If you don’t have Brew on your machine, first check out this article for installation instructions.
2. Create a Cartfile
Change directories to your Xcode project folder:
cd /Users/username/Documents/path/to/TwoDirectionalScroller
Note: Instead of typing the path, just drag the folder from Finder directly into your Terminal window.
Create a Cartfile:
touch Cartfile
And add the following text to the Cartfile, using your favorite text editor:
github "Alamofire/Alamofire" ~> 3.0
github "Alamofire/AlamofireImage" ~> 2.0
github "SwiftyJSON/SwiftyJSON"
3. Build your frameworks
Carthage will generate frameworks based on code downloaded from github. This will take a few minutes to complete.
carthage update
4. Integrate frameworks into your project
Now you just need to find these frameworks, and drag them into Xcode. Use the following command to open Finder from your current command line path:
open .
Within Finder, drill down to Carthage / Build / iOS. You should see the following files:
- Alamofire.framework
- AlamofireImage.framework
- SwiftyJSON.framework
Drag these three files into your Project Navigator in Xcode. For this project, I dropped them directly above my AppDelegate.swift file.
When presented with a dialog, make sure you check the box for “Copy items if needed”.
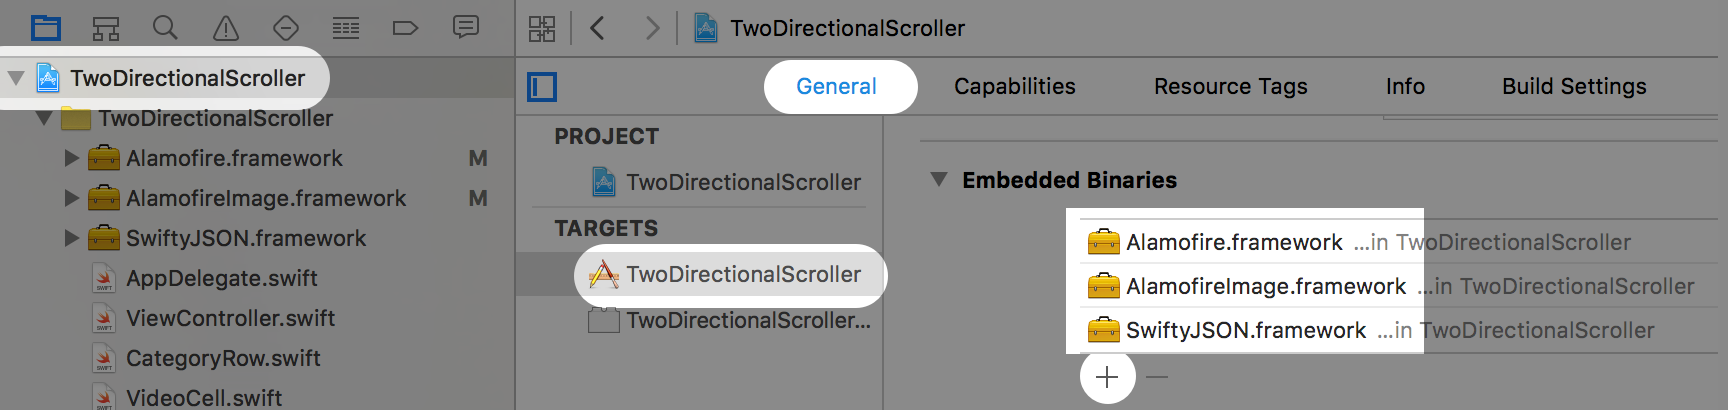
5. Add the frameworks as Embedded Binaries
- Under TARGETS, select the TwoDirectionalScroller target.
- Select the General tab.
- Scroll down to Embedded Binaries.
- Click the Plus button.
- Add the three missing frameworks.
Setting up the Models
In order to keep things straight, I created three types of models:
- Movie: This represents an individual movie or video. It has a name, imageURL, and movie description.
- Genre: This is a genre or category like “Action” or “Kids”. It has a name, and contains a collection of Movie objects.
- Catalog: This is a singleton that contains a hard-coded collection of genres and movies.
1. Movie data model
Create a Swift file named Movie.swift and add the following code:
import UIKit
import Alamofire
import SwiftyJSON

class Movie {
    var name:String
    var imageURL:String
    var movieDescription:String

    func updateImageURL(){
        let parameters:[String: AnyObject] = [
            "t": name,
            "y": "",
            "plot": "short",
            "r": "json"
        ]
        let omdbAPI = "https://www.omdbapi.com/"
        let URL = NSURL(string: omdbAPI)!
        let URLRequest = NSMutableURLRequest(URL: URL)
        URLRequest.HTTPMethod = "GET"
        request(ParameterEncoding.URL.encode(URLRequest, parameters: parameters).0)
            .responseJSON() { response in
                guard let dataValue = response.result.value else { return }
                let json = JSON(dataValue)
                self.imageURL = json["Poster"].stringValue
                self.name = json["Title"].stringValue
                self.movieDescription = json["Plot"].stringValue
            }
    }

    // Created model without imageURL, so need to fetch it.
    init(name: String){
        self.name = name
        self.imageURL = ""
        self.movieDescription = ""
        updateImageURL()
    }
}
A lot is going on here!
The Movie has three properties: name, imageURL, and movieDescription.
In a real project, you would fetch a collection from your server API. Unfortunately, we don’t have such an endpoint. Also, I could only figure out how to fetch individual movies from IMDB. So, much of this code is to workaround these limitations.
The app has a hard-coded catalog of movies (more on this later), and it only knows about the movie name. When the Movie is instantiated with just a name, it automatically tries to look up the imageURL and movie description from IMDB using the updateImageURL() method.
Inside updateImageURL(), you construct a dictionary of parameters that IMDB expects. Then you configure a NSMutableURLRequest object with your IMDB url and verb. Then you use Alamofire’s ParameterEncoding to append your URL parameters to your request. For example, the final URL will look something like this:
https://www.omdbapi.com/?plot=short&r=json&t=Shawshank%20Redemption&y=
One very important detail is that the endpoint is using https. This is to avoid App Transport Security errors associated with using http.
If you want to learn more about using the IMDB APIs, check out this link.
In the callback, you use SwiftyJSON to parse the response object, and update your imageURL and movie description fields.
Note: in a real project, you may want to use URLRequestConvertible. This helps keep your code dry and organized as you add more and more API calls. Check out our previous blog post: 4 Essential Swift Networking Tools for Working with REST APIs for more details.
2. Genre data model
Create a Swift file named Genre.swift and add the following code:
import Foundation

class Genre {
    let name:String
    let movies:[Movie]

    init(name: String, movies: [Movie]){
        self.name = name
        self.movies = movies
    }
}
The Genre object just has a name and an array of movies. This will eventually get passed into the CategoryRow to populate each category/genre.
3. Catalog data model
Create a Swift file named Catalog.swift and add the following code:
import Foundation

class Catalog {
    static let sharedInstance = Catalog()
    let genres:[Genre]

    init(){
        // action
        let rambo = Movie(name: "Rambo")
        let dieHard = Movie(name: "Die Hard")
        let avengers = Movie(name: "The Avengers")
        let bourneIdentity = Movie(name: "Bourne Identity")
        let action = Genre(name: "Action", movies: [rambo, dieHard, avengers, bourneIdentity])
        // drama
        let forrestGump = Movie(name: "Forrest Gump")
        let shawshank = Movie(name: "Shawshank Redemption")
        let titanic = Movie(name: "Titanic")
        let drama = Genre(name: "Drama", movies: [forrestGump, shawshank, titanic])
        // Science Fiction
        let matrix = Movie(name: "The Matrix")
        let terminator = Movie(name: "The Terminator")
        let scienceFiction = Genre(name: "Science Fiction", movies: [matrix, terminator])
        // Kids
        let insideOut = Movie(name: "Inside Out")
        let toyStory = Movie(name: "Toy Story")
        let up = Movie(name: "Up")
        let findingNemo = Movie(name: "Finding Nemo")
        let kids = Genre(name: "Kids", movies: [insideOut, toyStory, up, findingNemo])

        genres = [action, drama, scienceFiction, kids]

    }
}
The Catalog is a singleton that holds the video library. When it is first accessed, it initializes itself with a whole bunch of hard-coded genres, and movies within that genre.
Remember that these movies are created with the name initializer. The Movie model will automatically fetch the rest of the information from IMDB.
Wiring up the Controllers to the Models
The original sample project used a hard-coded array of data, and rendered a bunch of empty red cells. Now that we have real data coming back, it’s time to wire things up.
1. Update ViewController.swift
import UIKit

class ViewController: UIViewController {

    @IBOutlet weak var tableView: UITableView!

    func delay(seconds seconds: Double, completion:()->()) {
        let popTime = dispatch_time(DISPATCH_TIME_NOW, Int64( Double(NSEC_PER_SEC) * seconds ))
        dispatch_after(popTime, dispatch_get_main_queue()) {
            completion()
        }
    }

    override func viewDidLoad() {
        delay(seconds: 1.0){
            self.tableView.reloadData()
        }
    }

    override func prepareForSegue(segue: UIStoryboardSegue, sender: AnyObject?) {
        if let videoCell = sender as? VideoCell,
        let videoDetailPage = segue.destinationViewController as? VideoDetail {
            let movie = videoCell.movie
            videoDetailPage.movie = movie
        }
    }
}

extension ViewController : UITableViewDelegate { }

extension ViewController : UITableViewDataSource {

    func tableView(tableView: UITableView, titleForHeaderInSection section: Int) -> String? {
        return Catalog.sharedInstance.genres[section].name
    }

    func numberOfSectionsInTableView(tableView: UITableView) -> Int {
        return Catalog.sharedInstance.genres.count
    }

    func tableView(tableView: UITableView, numberOfRowsInSection section: Int) -> Int {
        return 1
    }

    func tableView(tableView: UITableView, cellForRowAtIndexPath indexPath: NSIndexPath) -> UITableViewCell {
        let cell = tableView.dequeueReusableCellWithIdentifier("cell") as! CategoryRow
        cell.genre = Catalog.sharedInstance.genres[indexPath.section]
        return cell
    }

}
Note: You’ll run into some compiler errors. These will go away as you progress through this blog post.
A few things to point out:
There’s a new tableView IBOutlet, so be sure to wire it up in the Storyboard.
Also, there’s a rather hacky use of a delay function that reloads the table after one second. Since we don’t have a server endpoint to return a collection of videos, we give all the IMDB calls exactly one second to come back with movie information for each item in the Catalog. This is just a temporary measure to get this example working — please don’t do something like this in your production app. =)
All the Table View DataSource methods now use the Catalog.sharedInstance data, instead of hard-coded numbers and arrays.
One thing that’s new is the passing along of data in cellForRowAtIndexPath. Here, you pass the entire Genre object to the CategoryRow.
Also, there’s a new prepareForSegue which handles the passing of data for when a user taps a video cell. Later on, you’ll create a VideoDetail page, and wire a segue from the video cell to the detail page.
2. Update CategoryRow.swift
import UIKit

class CategoryRow : UITableViewCell {
    @IBOutlet weak var collectionView: UICollectionView!
    var genre:Genre? = nil {
        didSet {
            collectionView.reloadData()
        }
    }
}

extension CategoryRow : UICollectionViewDataSource {

    func collectionView(collectionView: UICollectionView, numberOfItemsInSection section: Int) -> Int {
        return genre!.movies.count
    }

    func collectionView(collectionView: UICollectionView, cellForItemAtIndexPath indexPath: NSIndexPath) -> UICollectionViewCell {
        let cell = collectionView.dequeueReusableCellWithReuseIdentifier("videoCell", forIndexPath: indexPath) as! VideoCell
        if let genre = genre {
            cell.movie = genre.movies[indexPath.row]
        }
        return cell
    }

}

extension CategoryRow : UICollectionViewDelegateFlowLayout {

    func collectionView(collectionView: UICollectionView, layout collectionViewLayout: UICollectionViewLayout, sizeForItemAtIndexPath indexPath: NSIndexPath) -> CGSize {
        let itemsPerRow:CGFloat = 4
        let hardCodedPadding:CGFloat = 5
        let itemHeight = collectionView.bounds.height - (2 * hardCodedPadding)
        let itemWidth = itemHeight * 300 / 444
        return CGSize(width: itemWidth, height: itemHeight)
    }

}
A few things to point out:
A Genre object is passed in from ViewController.swift. When this object is set, you reload the collection view. Also, the Collection View DataSource methods now rely on information from the Genre object.
There’s also a slight change in the calculation of the Collection View Cell width. The IMDB images have an aspect ratio of 300 x 444. Don’t forget to change the ImageView to aspectFit in the Storyboard.
3. Update VideoCell.swift
import UIKit
import AlamofireImage

class VideoCell : UICollectionViewCell {
    @IBOutlet weak var imageView: UIImageView!
    var movie:Movie? = nil {
        didSet {
            if let movie = movie,
                let url = NSURL(string: movie.imageURL) {
                self.imageView.af_setImageWithURL(url)
            }
        }
    }
}
In my previous networking blog post, I used an Image Response Serializer to handle the downloading of images. Alamofire has since come out with AlamofireImage, which looks promising.
It’s pretty awesome — just add an import statement, and call imageView.af_setImageWithURL() and you’re good to go!
4. Update Info.plist
Before this actually starts working, you do need to make a change to your Info.plist file:
<?xml version="1.0" encoding="UTF-8"?>
<!DOCTYPE plist PUBLIC "-//Apple//DTD PLIST 1.0//EN" "http://www.apple.com/DTDs/PropertyList-1.0.dtd">
<plist version="1.0">
<dict>
	<key>NSAppTransportSecurity</key>
	<dict>
		<key>NSExceptionDomains</key>
		<dict>
			<key>ia.media-imdb.com</key>
			<dict>
				<key>NSIncludesSubdomains</key>
				<true/>
				<key>NSTemporaryExceptionAllowsInsecureHTTPLoads</key>
				<true/>
			</dict>
		</dict>
	</dict>
	<key>CFBundleDevelopmentRegion</key>
	<string>en</string>
	<key>CFBundleExecutable</key>
	<string>$(EXECUTABLE_NAME)</string>
...
This creates an exception for http calls to the ia.media-imdb.com domain, which hosts the images. For more information on App Transport Security, check out this StackOverflow article.
Note: when making your app production-ready, you need to remember to nil out the image in prepareForReuse so your recycled cells don’t have prior images in them. You might also need to make sure in-flight image requests are cancelled when the cell scrolls off screen, so the images don’t come back and clobber the recycled cell. Check out this related blog post on AlamofireImage and take note of how their reset() method.
Adding the Video Detail Page
You’ll need to created a new View Controller in the Storyboard that contains an UIImageView and two UILabels.
Then, create a new VideoDetail.swift file:
import UIKit
import AlamofireImage

class VideoDetail : UIViewController {
    var movie:Movie? = nil

    @IBOutlet weak var movieName: UILabel!
    @IBOutlet weak var movieDescription: UILabel!
    @IBOutlet weak var imageView: UIImageView!

    override func viewDidLoad() {
        if let movie = movie {
            movieName.text = movie.name
            movieDescription.text = movie.movieDescription
            if let url = NSURL(string: movie.imageURL) {
                self.imageView.af_setImageWithURL(url)
            }
        }
    }
}
Make sure to set the class of the View Controller to VideoDetail. Also, wire up the outlets for the image and labels.
Don’t forget to create a segue from the VideoCell to this View Controller. Remember that VideoDetail receives a Movie object from ViewController.swift in the prepareForSegue() method.
Build and Run
Finally, build and run. If all goes well, you should see something like this:
Conclusion
So, this was a really quick run-through for integrating network calls into the two-directional scroller.
If you need more context, be sure to go through the original blog post: Want your Swift app to scroll in two directions, like Netflix? Here’s how. Also, don’t forget to brush up on networking tools which was covered in: 4 Essential Swift Networking Tools for Working with REST APIs.
The final code is found on this branch in github.
Got any tips for working with AlamofireImage or Collection Views? Have any suggestions for future tutorial topics? Feel free to add your thoughts to the comments.
Like this post? Please share it! Then follow us on Twitter @thorntech or join our mailing list below for future updates.