Search for places using MKLocalSearchRequest and display results with UISearchController

Apple provides a powerful native map API called MapKit. You can display a map, show the user’s current location, and drop annotation pins. And you don’t need to rely on any third-party SDKs.
For example, if you’re building an app that shows branch locations, displays geotagged content, or does anything involving a map, MapKit is the tool for you.
Maps contain a lot of information, so it’s natural for users to search for places. Just check out any popular app with a map like Yelp, Zillow, or Uber and you’ll see a search bar with a results table.

In this tutorial, you’re going to implement a map search that displays location results in a table.
Selecting a table row will cause a pin to drop on the map. The pin will have a callout button that app-switches to Apple Maps for driving directions.
This tutorial is broken up into several sections. While there are great resources out there that cover each topic individually, the goal here is to integrate them into a single cohesive feature.
Here’s a table of contents if you want to jump straight to a particular section:
- Get user location
- Set up a Map Kit View
- Use UISearchController to display search results
- Search for locations using MKLocalSearchRequest
- Drop a map pin and create a callout button
Get User Location
It’s reasonable for an app with a map to ask for the user’s current location. You can conveniently zoom to the local area. And map searches can prioritize results by proximity.
Let’s get started with a new project:
1. Create a new project
Create a new Single View Application in Swift.
a. Within Xcode, go to File New Project…
b. Select iOS Application Single View Application
c. Name the project MapKitTutorial
d. Select Swift as the language
For this tutorial, uncheck the boxes for Use Core Data, Include Unit Tests, and Include UI Tests just to keep things simple.
2. Configure the location permission prompt message
Before you can get the user’s location, you first need permission. You’ll trigger a permission dialog in a later step. But for now, you can customize the description text that will appear in the alert dialog.
a. Select Info.plist from the Project navigator
b. Hover your mouse any item and click the plus button
c. For the Key, paste in NSLocationWhenInUseUsageDescription
d. Make sure the Type is set to String
e. Set the Value to anything you want, such as This tutorial wants to use your location

Configuring this key within Info.plist is a mandatory step. If this key is missing, iOS will simply not prompt the user, and the user wont get the chance to allow permission.
3. Set up the Location Manager
CLLocationManager is the object you’ll use for pretty much anything location related. You will use it to prompt the user for permission, and ask the device for the current location. Delegate methods are used to handle any responses.
To set up the Location Manager:
a. Open ViewController.swift
b. Replace the contents of ViewController.swift with the following code:
import UIKit
import MapKit

class ViewController : UIViewController {
    let locationManager = CLLocationManager()

    override func viewDidLoad() {
        super.viewDidLoad()
    }
}
The import statement gives you access to classes that begin with MK (Map Kit) and CL (Core Location).
The CLLocationManager variable gives you access to the location manager throughout the scope of the controller.
c. Replace viewDidLoad() with the following code:
override func viewDidLoad() {
    super.viewDidLoad()
    locationManager.delegate = self
    locationManager.desiredAccuracy = kCLLocationAccuracyBest
    locationManager.requestWhenInUseAuthorization()
    locationManager.requestLocation()
}
This is what’s going on in this code:
locationManager.delegate: It could take some time for requested information to come back, so delegate methods are used to handle responses asynchronously. You’ll implement these delegate methods momentarily.
locationManager.desiredAccuracy: This step is optional, but you might want to override the default accuracy level with an explicit value, like kCLLocationAccuracyBest. Or you could use something less accurate like kCLLocationAccuracyHundredMeters to conserve battery life.
locationManager.requestWhenInUseAuthorization(): This triggers the location permission dialog. The user will only see the dialog once.
locationManager.requestLocation(): This API call was introduced in iOS 9 and triggers a one-time location request.
Note: For iOS 8 and prior, you’ll have to use locationManager.startUpdatingLocation(), which is a little more difficult to use. This API continuously requests the current location, and leaves it up to the developer to figure out when to stop location updates. I highly recommend reading iOS Apprentice by Ray Wenderlich to learn more about using this method.
At this point, you should see a compiler error because the delegate methods haven’t been implemented yet:

4. Set up the Location Manager Delegate
The Location Manager Delegate methods process Location Manager responses. There will be responses to the authorization and location requests you sent earlier in viewDidLoad.
Add this class extension to the bottom of ViewController.swift, outside of the class body:
extension ViewController : CLLocationManagerDelegate {
    func locationManager(manager: CLLocationManager, didChangeAuthorizationStatus status: CLAuthorizationStatus) {
        if status == .AuthorizedWhenInUse {
            locationManager.requestLocation()
        }
    }

    func locationManager(manager: CLLocationManager, didUpdateLocations locations: [CLLocation]) {
        if let location = locations.first {
            print("location:: (location)")
        }
    }

    func locationManager(manager: CLLocationManager, didFailWithError error: NSError) {
        print("error:: (error)")
    }
}
Here is what is going on:
extension: You put everything into a class extension rather than the class body. This is just a code organization technique to group related delegate methods.
locationManager(_:didChangeAuthorizationStatus:): This method gets called when the user responds to the permission dialog. If the user chose Allow, the status becomes CLAuthorizationStatus.AuthorizedWhenInUse.
You also trigger another requestLocation() because the first attempt would have suffered a permission failure.
locationManager(_:didUpdateLocations:): This gets called when location information comes back. You get an array of locations, but you’re only interested in the first item. You don’t do anything with it yet, but eventually you will zoom to this location.
locationManager(_:didFailWithError:): For now, just print out the error.
Note: Although this last method is optional, leaving it out will cause the app to crash with this error:

Build and run
This is what the code looks like so far:
You should be prompted with a location permission dialog. The alert description uses the body copy you set earlier within Info.plist.
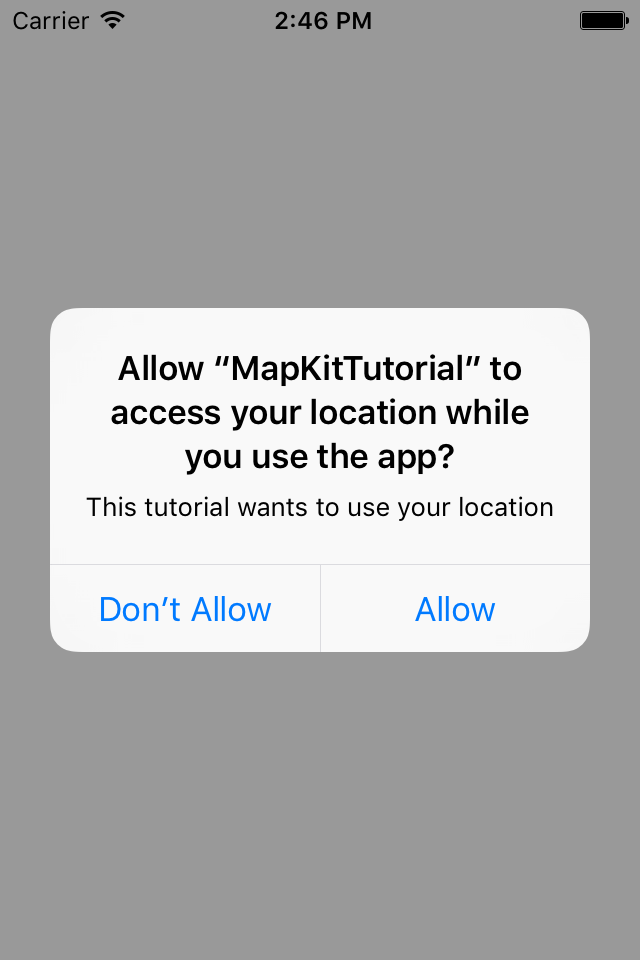
Tap Allow, and you should see the following logged to the console, thanks to your print statement inside didUpdateLocations:

Note: Occasionally, you’ll run into the following error:
Error Domain=kCLErrorDomain Code=0 "The operation couldn't be completed. (kCLErrorDomain error 0.)"
The first thing is to make sure your Simulator has a location set under Debug > Location > Custom Location…

If you’re still getting the error, try quitting the Simulator and re-running the app in Xcode.
Section Recap
First, you created a location manager and triggered a location request. Then you implemented delegate methods to handle incoming location data.
You also had to juggle permissions. You requested location permission from the user. The user was presented with an alert dialog which used body copy from the Info.plist file. Then you implemented a delegate method that listened for an authorization change so you could re-attempt the location request.
For further reading about user location, check out this NSHipster article which covers requestLocation. Also check out iOS Apprentice by Ray Wenderlich part 3 which covers location in-depth.
Set up a Map Kit View
Now that you have the user’s location, it’s time to set up the map. In this section, you will wire up auto-layout constraints, a delegate, and an outlet to a map view within the Storyboard.
1. Wire up auto-layout constraints
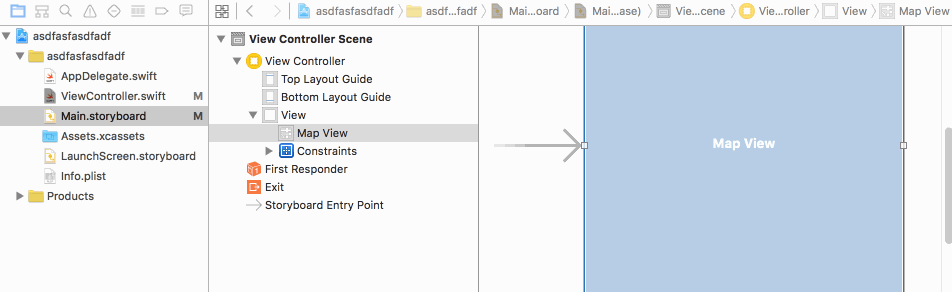
a. Open Main.storyboard from the Project navigator
b. Drag a Map Kit View from the Object Library onto the View Controller Scene.
c. Select the Pin icon near the bottom right of the screen
d. Uncheck Constrain to margins
e. Set the constraint values to zero in all four directions. Make sure the orange beams are highlighted.
f. Select Update Frames > Items of New Constraints
g. Click Add Constraints

These constraints pin the map to the edges of the main View Controller screen.
2. Wire up the map delegate
The Map View Delegate is responsible for managing annotations. You’ll be using delegate methods to customize pins and callouts later on.
a. Hold down Control and drag from the Map Kit View onto the yellow Scene icon
b. Select delegate from the pop-up menu

3. Enable the user’s location on the map
The Map Kit View comes with a blue pulsing dot that shows the user’s current location. A checkbox in the Storyboard enables this.
a. Select the Map View within the View Hierarchy
b. In the Attributes Inspector, check the box for User Location

4. Create an IBOutlet
The IBOutlet is your handle to the Map Kit View object. Later on, you’ll be using it to drop pins and zoom to a pin’s location.
a. Within the Project Navigator, hold down Alt, and click on ViewController.swift
This opens the ViewController.swift file side-by-side with the Storyboard.
b. Control-drag from the Map Kit View onto the ViewController class, directly below the locationManager variable.
You should see a pop-over dialog for creating an outlet.
c. Type mapView as the Outlet name.
d. Click Connect
Xcode should automatically generate and wire up the following code for you:
@IBOutlet weak var mapView: MKMapView!
5. Zoom to the user’s current location
Now that you have a handle to the Map Kit View, you can zoom to the user’s location.
a. Open ViewController.swift
b. Replace the code for locationManager(_:didUpdateLocations:) with the following:
func locationManager(manager: CLLocationManager, didUpdateLocations locations: [CLLocation]) {
    if let location = locations.first {
        let span = MKCoordinateSpanMake(0.05, 0.05)
        let region = MKCoordinateRegion(center: location.coordinate, span: span)
        mapView.setRegion(region, animated: true)
    }
}
locationManager(_:didUpdateLocations:) gives you an array of locations, but you’re only interested in the first one.
In order to zoom to this location, you need to perform a few intermediate steps. You define a map region, which is a combination of the map center (coordinate) and zoom level (span). The coordinate is property from the first location object. And the span is an arbitrary area of 0.05 degrees longitude and latitude.

Once you combine the coordinate and span into a region, you can zoom using setRegion(_:animated:).
Build and run
This is what the code looks like so far:
You should see the map zoom toward a blue pulsing dot at your current location.

Section Recap
In this section, you wired up the Map Kit View constraints, delegate, and outlet in the Storyboard. Then you used the map view outlet to zoom to the user’s location.
I found this article helpful when learning Map Kit for the first time. It covers coordinates, spans, regions, and basic annotations.
Use UISearchController to display search results
UISearchController is a special UI element that is optimized for displaying search results. It has a search bar that shows or hides a results table, based on the search bar state. It was introduced in iOS 8, and it replaces the deprecated UISearchDisplayController.

The search bar is accessible from both the current page and the search results page. Typically, you embed the search bar in the navigation bar or table view header. When you tap inside the search bar, a semi-transparent modal appears over the current screen. As you start typing, a table view appears within the modal. The search bar’s cancel button dismisses the modal overlay.

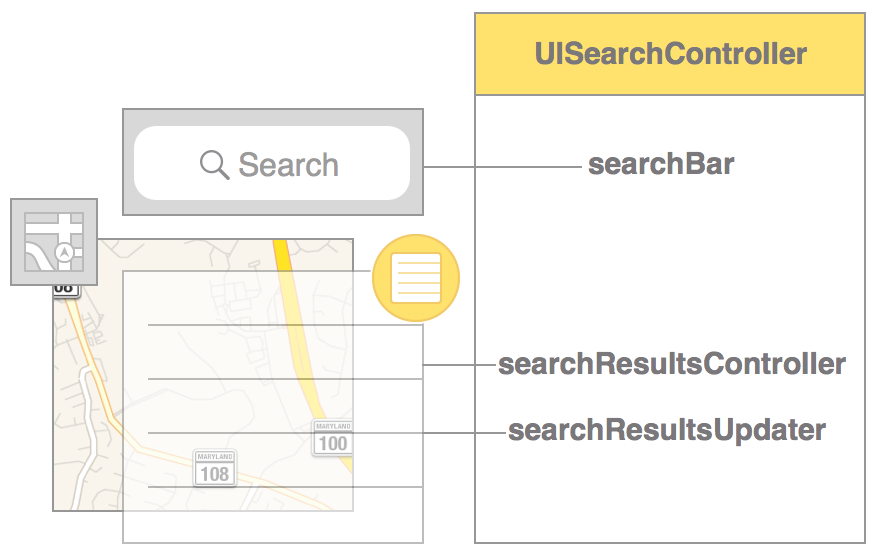
UISearchController is made up of three major parts:
searchBar: A search bar comes included with UISearchController.
searchResultsController: This is a custom View Controller you provide to display search results. In this tutorial, you will use a Table View Controller.
searchResultsUpdater: This is a delegate that responds to search bar text entry. In this tutorial, the Table View Controller will implement this delegate and update the table view data source accordingly.
Note: UISearchController does not exist in the Storyboard object library. This means that you will have to a lot of things in code, such as position the search bar UI and instantiate the searchResultsController.
Let’s start with something familiar, and configure a Table View Controller in the Storyboard
1. Set up the Table View Controller
a. Drag a Table View Controller from the Object Library onto the Storyboard.
Make sure you use the Table View Controller with the yellow icon, and not the Table View with the gray icon.
b. Create a new file: FileNewFile…
c. Choose iOSSourceSwift File
d. Name the file LocationSearchTable and click Create
e. Replace the contents of the LocationSearchTable.swift file with the following:
import UIKit
class LocationSearchTable : UITableViewController {

}
f. Go back to the Storyboard, and select the Table View Controller scene
g. In the Identity Inspector, set the class to LocationSearchTable
h. Set the Storyboard ID to LocationSearchTable. Just in case you’re just skimming, pay attention to this particular step.

i. Select the Table View Cell in the view hierarchy
j. In the Attributes Inspector, set the cell Style to subtitle
k. Set the Identifier to cell

This is just a typical Table View Controller setup. One important difference though is the use of a Storyboard ID, which you’ll use in a later step.
2. Embed the View Controller inside a Navigation Controller
a. In the Storyboard, select the View Controller scene (the one containing the map)
b. Go to EditorEmbed InNavigation Controller

You should now see something like this in the Storyboard. The Navigation Controller gives you a free navigation bar which will become the future home of the search bar.
3. Set up the UISearchController
Now it’s time to write some UISearchController code.
a. Create a property for the UISearchController
Within the ViewController class body, add the following variable:
var resultSearchController:UISearchController? = nil
This variable has controller-level scope to keep the UISearchController in memory after it’s created.
b. Set up the search results table
Append the following code to the contents of viewDidLoad:
let locationSearchTable = storyboard!.instantiateViewControllerWithIdentifier("LocationSearchTable") as! LocationSearchTable
resultSearchController = UISearchController(searchResultsController: locationSearchTable)
resultSearchController?.searchResultsUpdater = locationSearchTable
The locationSearchTable is the Table View Controller you set up earlier in the Storyboard. Thanks to the Storyboard ID, you can instantiate it programmatically.
The locationSearchTable will also serve as the searchResultsUpdater delegate. For now, you will see the following compiler error, which you’ll fix momentarily:

c. Set up the UISearchController delegate
In the Project navigator, open LocationSearchTable.swift.
Add the following class extension to the bottom, outside of the class body:
extension LocationSearchTable : UISearchResultsUpdating {
    func updateSearchResultsForSearchController(searchController: UISearchController) {
    }
}
You will fully implement this method in a later section. But for now, this is just a stub to silence the compiler error.
d. Set up the search bar
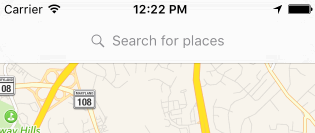
Switch back to ViewController.swift, and append the following code to the contents of viewDidLoad:
let searchBar = resultSearchController!.searchBar
searchBar.sizeToFit()
searchBar.placeholder = "Search for places"
navigationItem.titleView = resultSearchController?.searchBar
This configures the search bar, and embeds it within the navigation bar.
e. Configure the UISearchController appearance
Add some more code to viewDidLoad:
resultSearchController?.hidesNavigationBarDuringPresentation = false
resultSearchController?.dimsBackgroundDuringPresentation = true
definesPresentationContext = true
hidesNavigationBarDuringPresentation determines whether the Navigation Bar disappears when the search results are shown. Set this to false, since we want the search bar accessible at all times.
dimsBackgroundDuringPresentation gives the modal overlay a semi-transparent background when the search bar is selected.
Setting definesPresentationContext to true is an important but easily overlooked step. By default, the modal overlay will take up the entire screen, covering the search bar. definesPresentationContext limits the overlap area to just the View Controller’s frame instead of the whole Navigation Controller.
Note: There’s also a corresponding checkbox in the Storyboard called Defines Context in the Attributes Inspector that also sets the definesPresentationContext flag.
Build and run
This is what the code looks like so far:
You should see a search bar inside the Navigation Bar. As you type, an empty table will appear. Hit Cancel and the table disappears.
Your viewDidLoad method is starting to look like a massive block of code. This can feel intimidating at first. But it’s actually kind of convenient, because you can just copy and paste this block between projects.
Section Recap
Don’t worry if UISearchController is confusing — it could take a while to get used to.
In this section, you used UISearchController to display a search results table overlay. UISearchController comes with a built-in search bar which you embedded inside the navigation bar.
You also created a Table View Controller that acts as both the searchResultsController and searchResultsUpdater. In the next section, you’ll use Apple’s local search API to populate the table with real data.
There is more than one way to configure UISearchController. For example, your content might already be in table format and you just want to filter it in-place. For this use case, I recommend checking out this UISearchController tutorial on raywenderlich.com.
Search for locations using MKLocalSearchRequest
Apple provides a location search API for querying places. This API is free, which is one reason you might use native MapKit over a 3rd party SDK like Google Maps.
1. Wire up map elements
a. At the top of LocationSearchTable.swift, add the following line:
import MapKit
You did this in ViewController.swift, but you’ll also need it for LocationSearchTable.swift.
b. Within the LocationSearchTable class body, add the following variables:
var matchingItems:[MKMapItem] = []
var mapView: MKMapView? = nil
matchingItems: You will use this later on to stash search results for easy access.
mapView: Search queries rely on a map region to prioritize local results. The mapView variable is a handle to the map from the previous screen. You’ll wire this up in the next step.
c. Switch to ViewController.swift, and append the following line to the contents of viewDidLoad:
locationSearchTable.mapView = mapView
This passes along a handle of the mapView from the main View Controller onto the locationSearchTable.
2. Set up the API call
Switch back again to LocationSearchTable.swift, and replace updateSearchResultsForSearchController(_:) with the following code:
func updateSearchResultsForSearchController(searchController: UISearchController) {
    guard let mapView = mapView,
        let searchBarText = searchController.searchBar.text else { return }
    let request = MKLocalSearchRequest()
    request.naturalLanguageQuery = searchBarText
    request.region = mapView.region
    let search = MKLocalSearch(request: request)
    search.startWithCompletionHandler { response, _ in
        guard let response = response else {
            return
        }
        self.matchingItems = response.mapItems
        self.tableView.reloadData()
    }
}
The guard statement unwraps the optional values for mapView and the search bar text.
MKLocalSearchRequest: A search request is comprised of a search string, and a map region that provides location context. The search string comes from the search bar text, and the map region comes from the mapView.
MKLocalSearch performs the actual search on the request object. startWithCompletionHandler() executes the search query and returns a MKLocalSearchResponse object which contains an array of mapItems. You stash these mapItems inside matchingItems, and then reload the table.

3. Set up the Table View Data Source
Now that data is coming back from the API, it’s time to wire up the UI.
Add another class extension to the bottom of LocationSearchTable.swift:
extension LocationSearchTable {
    override func tableView(tableView: UITableView, numberOfRowsInSection section: Int) -> Int {
        return matchingItems.count
    }

    override func tableView(tableView: UITableView, cellForRowAtIndexPath indexPath: NSIndexPath) -> UITableViewCell {
        let cell = tableView.dequeueReusableCellWithIdentifier("cell")!
        let selectedItem = matchingItems[indexPath.row].placemark
        cell.textLabel?.text = selectedItem.name
        cell.detailTextLabel?.text = ""
        return cell
    }
}
This extension groups all the UITableViewDataSource methods together.
The matchingItems array determines the number of table rows.
Each cell was configured with an identifier of cell in a previous section. The cell’s built-in textLabel is set to the placemark name of the Map Item.
The cell’s detailTextLabel is set to an empty string for now. You will populate this with the address later on.
Build and run
This is what the code looks like so far:
Select the search bar and start searching for something like “Target”. You should see search results populate the table.

4. Add the placemark address
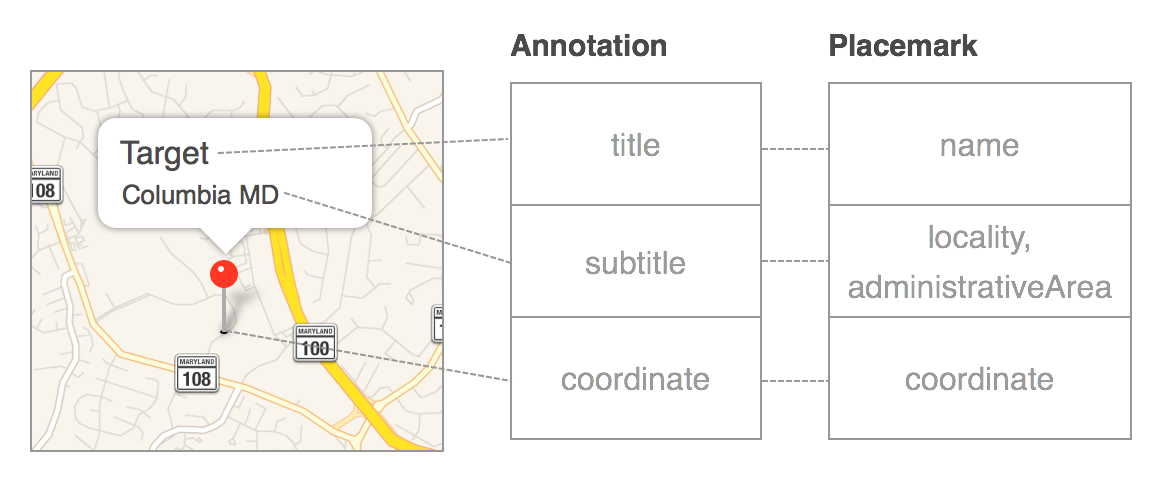
So far, you’ve only used the placemark name. Placemarks have other properties like subThoroughfare and administrativeArea which correspond to street number and state. You can piece together these properties to form a full postal address.
In this section, you will squeeze the postal address into a single line so that it fits inside the cell’s detailTextLabel.
a. Add the following method within the LocationSearchTable class body:
func parseAddress(selectedItem:MKPlacemark) -> String {
    // put a space between "4" and "Melrose Place"
    let firstSpace = (selectedItem.subThoroughfare != nil && selectedItem.thoroughfare != nil) ? " " : ""
    // put a comma between street and city/state
    let comma = (selectedItem.subThoroughfare != nil || selectedItem.thoroughfare != nil) && (selectedItem.subAdministrativeArea != nil || selectedItem.administrativeArea != nil) ? ", " : ""
    // put a space between "Washington" and "DC"
    let secondSpace = (selectedItem.subAdministrativeArea != nil && selectedItem.administrativeArea != nil) ? " " : ""
    let addressLine = String(
        format:"%@%@%@%@%@%@%@",
        // street number
        selectedItem.subThoroughfare ?? "",
        firstSpace,
        // street name
        selectedItem.thoroughfare ?? "",
        comma,
        // city
        selectedItem.locality ?? "",
        secondSpace,
        // state
        selectedItem.administrativeArea ?? ""
    )
    return addressLine
}
This method converts the placemark to a custom address format like: “4 Melrose Place, Washington DC”.
It’s not important to know how the above code works. But basically, it adds commas and spaces, even if some of the properties come back as nil. For example, it doesn’t make sense to split up the string with a comma if the street information is missing.
Note: there’s a method ABCreateStringWithAddressDictionary(_:_:) that is part of the AddressBookUI framework which parses an address dictionary into a string. However, this was deprecated in iOS 9 and doesn’t give us exactly what we need.
b. Populate the cell with the address
Now that we have a postal address, it’s time to add it to the subtitle cell. Within cellForRowAtIndexPath, replace the detailTextLabel text assignment with the following code:
cell.detailTextLabel?.text = parseAddress(selectedItem)
Build and run
This is what the code looks like so far:
- ViewController.swift (no change)
- LocationSearchTable.swift
Now when you search for “McDonalds”, you should see the address.

Section Recap
MKLocalSearchRequest is a free API that returns locations based on a search string and map region. You used the UISearchResultsUpdating delegate to call this API each time the search text changed. You then displayed the name and address of the search results in the table view.
Drop a Map Pin and create a callout button
In this section, you will drop a pin on the map whenever the user taps on a search result. Since the map and table view are in two separate controllers, you’ll use a protocol to communicate between the two. You’ve been using protocols and delegates throughout this tutorial. But now you’ll be creating your own custom protocol.
Think of a protocol as a job description, and a delegate as an employee. The delegate is the one that actually performs the job, and it can assume multiple roles as long as he has the skills. Imagine an understaffed fast food joint where employees need to wear multiple “hats”. The guy taking your order is both the cashier, and the french fry guy. In this analogy, one delegate conforms to two protocols.
In this section, you will create a special job duty, or protocol, for the map controller. This role has just one responsibility, which is to drop a pin on the map. The table view controller will call this method whenever the user selects a search result.
1. Create the protocol
a. At the top of ViewController.swift, add the following protocol underneath the import statements, but above the class body:
protocol HandleMapSearch {
    func dropPinZoomIn(placemark:MKPlacemark)
}
This declares a custom protocol named HandleMapSearch. Anything that conforms to this protocol has to implement a method called dropPinZoomIn(_:).
Note: There aren’t any curly braces on the method. The protocol definition is only interested in the method signatures — the implementation goes somewhere else.
b. Within the ViewController class body, add the following variable:
var selectedPin:MKPlacemark? = nil
You’ll use this later on to cache any incoming placemarks. More on this later.
c. At the bottom of ViewController.swift, add another class extension:
extension ViewController: HandleMapSearch {
    func dropPinZoomIn(placemark:MKPlacemark){
        // cache the pin
        selectedPin = placemark
        // clear existing pins
        mapView.removeAnnotations(mapView.annotations)
        let annotation = MKPointAnnotation()
        annotation.coordinate = placemark.coordinate
        annotation.title = placemark.name
        if let city = placemark.locality,
        let state = placemark.administrativeArea {
            annotation.subtitle = "(city) (state)"
        }
        mapView.addAnnotation(annotation)
        let span = MKCoordinateSpanMake(0.05, 0.05)
        let region = MKCoordinateRegionMake(placemark.coordinate, span)
        mapView.setRegion(region, animated: true)
    }
}
This extension implements the dropPinZoomIn() method in order to adopt the HandleMapSearch protocol.
The incoming placemark is cached in the selectedPin variable. This will be useful later when you create the callout button.
removeAnnotations() clears the map of any existing annotations. This step is to ensure we’re only dealing with one annotation pin on the map at a time.
MKPointAnnotation is a map pin that contains a coordinate, title, and subtitle. The placemark has similar information like a coordinate and address information. Here you populate the title and subtitle with information that makes sense.
mapView.addAnnotation() adds the above annotation to the map.
setRegion() zooms the map to the coordinate. You create a span to specify a zoom level, just like you did in a previous section.
2. Wire up the protocol
a. Append the following code to the contents of viewDidLoad:
locationSearchTable.handleMapSearchDelegate = self
The parent (ViewController) passes a handle of itself to the child controller (LocationSearchTable). This variable doesn’t exist yet, so you’ll create it in the next step.
b. Switch to LocationSearchTable.swift, and add the following variable:
var handleMapSearchDelegate:HandleMapSearch? = nil
This should silence the compiler error from the previous step.
c. At the bottom of LocationSearchTable.swift, add another class extension:
extension LocationSearchTable {
    override func tableView(tableView: UITableView, didSelectRowAtIndexPath indexPath: NSIndexPath) {
        let selectedItem = matchingItems[indexPath.row].placemark
        handleMapSearchDelegate?.dropPinZoomIn(selectedItem)
        dismissViewControllerAnimated(true, completion: nil)
    }
}
This class extension groups UITableViewDelegate methods together.
When a search result row is selected, you find the appropriate placemark based on the row number. Then you pass the placemark to the map controller via the custom protocol method. Finally, you close the search results modal so the user can see the map.
Build and run
This is what the code looks like so far:
Type “Target” into the search bar and tap on one of the search result rows. The search table should dismiss and you should see a red pin with the name and city of the selected item.

3. Wire a button to the pin callout
You’re almost done! The last step is to customize the map pin callout with a button that takes you to Apple Maps for driving directions.
In ViewController.swift, add the following class extension:
extension ViewController : MKMapViewDelegate {
    func mapView(mapView: MKMapView, viewForAnnotation annotation: MKAnnotation) -> MKAnnotationView?{
        if annotation is MKUserLocation {
            //return nil so map view draws "blue dot" for standard user location
            return nil
        }
        let reuseId = "pin"
        var pinView = mapView.dequeueReusableAnnotationViewWithIdentifier(reuseId) as? MKPinAnnotationView
        pinView = MKPinAnnotationView(annotation: annotation, reuseIdentifier: reuseId)
        pinView?.pinTintColor = UIColor.orangeColor()
        pinView?.canShowCallout = true
        let smallSquare = CGSize(width: 30, height: 30)
        let button = UIButton(frame: CGRect(origin: CGPointZero, size: smallSquare))
        button.setBackgroundImage(UIImage(named: "car"), forState: .Normal)
        button.addTarget(self, action: "getDirections", forControlEvents: .TouchUpInside)
        pinView?.leftCalloutAccessoryView = button
        return pinView
    }
}
mapView(_:viewForAnnotation:) is a MKMapViewDelegate method that customizes the appearance of map pins and callouts. There’s a lot happening here, so let’s take this one step at a time.
MKUserLocation: The blue pulsing dot is a map annotation just like the map pins. You return nil so that you don’t interfere with the user’s blue location dot.
Pins are dequeued and reused just like table view cells. The reuseIdentifier is set to “pin” in this example.
MKPinAnnotationView is the map pin UI. You can set the pinTintColor, or determine whether it can show a callout. Although this is beyond the scope of this tutorial, you can also use a custom icon instead of the default pin.
leftCalloutAccessoryView: This is set to an UIButton that you instantiate programmatically. The button is set to a size of 30×30. The button image is set to an asset catalog image named car, and the button’s action is wired to a custom method called getDirections().
Note: you need to remember to create the car image, and implement the getDirections() method. Otherwise, the app will crash at runtime.
4. Implement the getDirections() method
Add the following method to the ViewController class:
func getDirections(){
    if let selectedPin = selectedPin {
        let mapItem = MKMapItem(placemark: selectedPin)
        let launchOptions = [MKLaunchOptionsDirectionsModeKey : MKLaunchOptionsDirectionsModeDriving]
        mapItem.openInMapsWithLaunchOptions(launchOptions)
    }
}
Here you use an API call that launches the Apple Maps app with driving directions. You convert the cached selectedPin to a MKMapItem. The Map Item is then able to open up driving directions in Apple Maps using the openInMapsWithLaunchOptions() method.
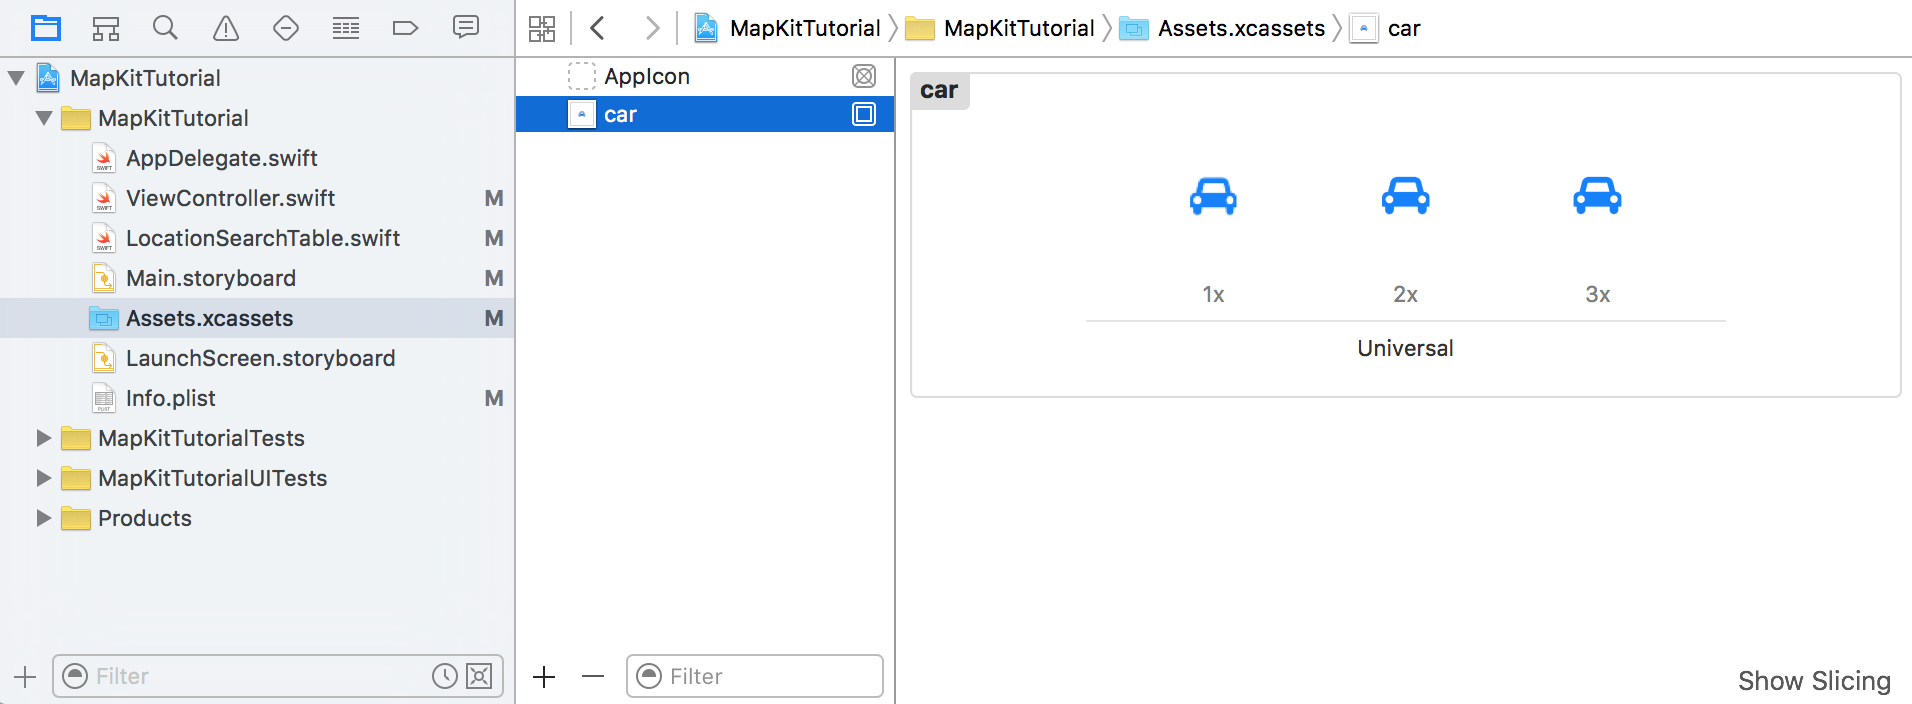
5. Create image assets for the car button icon
In the Project Navigator, open Assets.xcassets and create a New Image Set named car. You will need PNG files of various sizes (30×30, 60×60, and 90×90) to fill up the 1x, 2x, and 3x slots, respectively.
Go to fa2png.io and type in fa-car as the icon name. Then download the icon sizes listed above and drag them into the corresponding slots within the Xcode asset catalog.
Build and run
This is what the code looks like so far:
- ViewController.swift
- LocationSearchTable.swift (No change)
Type “Target” into the search bar. Tap on a search result and look for the pin on the map. Tap the pin to reveal the callout, and tap the car button to app-switch to Apple Maps for driving directions.
Section Recap
In this section, you used the custom protocol to pass the placemark information back to the map page. Then you loaded up an annotation with the placemark data and dropped a pin on the map.
You implemented a Map View delegate method that customizes the appearance of the pin when it is rendered. Besides making the pin orange, you created a callout button that takes the user to Apple Maps for driving directions.
Conclusion
You can download the final version of the project here. This is a really long tutorial, so good job for reading this far!
When adding a map feature to your app, chances are that you’ll need user location, map search, and some mechanism for displaying search results. There are good tutorials out there on how each component works individually. But piecing everything together takes a little bit of work. Hopefully this tutorial will help you build out your next map search feature.
Got any tips for working with maps and location? Have any suggestions for future tutorial topics? Feel free to add your thoughts to the comments.
Like this post? Please share it! Then follow us on Twitter @thorntech or join our mailing list below for future updates.