Nest UICollectionView inside UITableView for independent scrolling
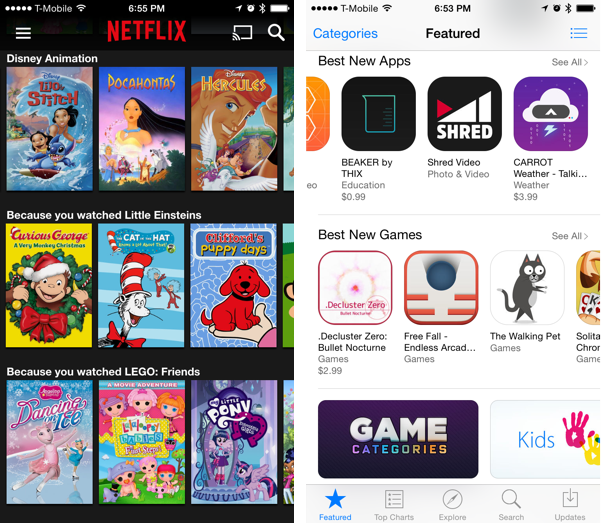
Want to give users a way to casually explore different categories of content without having to tap into a detail page? Independently scrolling rows can help you achieve this effect. Netflix and the App Store use this type of UI for their discovery dashboards.

Since the images are in sort of a grid, a Collection View seems like a natural tool of choice. Collection Views do support scrolling in both directions, but its sections are not designed to scroll independently. This is where Table Views come into the picture.
This tutorial covers how to leverage a Table View to handle vertical scrolling, while using a Collection View for the horizontal part. If you’re new to Collection Views, they’re very similar to Table Views in that they have a Data Source, Delegate, and reusable cells. Previously, we covered Table Views in this intro tutorial.
Update: There is now a Part 2 which covers how to make an API call to IMDB and populate the cells with movie images. It also integrates some of the questions raised in the comments, such as creating data models.
The Approach

The Table View is going to handle vertical scrolling. Each genre (action, drama, etc) is a table section that contains one header and one cell. The key really is to nest a Collection View inside the Table View row. Just remember to point the Collection View DataSource to the table cell rather than the View Controller, and everything will be just fine.
Set Up the Table View
1. Create a new Single View Application using Swift. In Xcode, go to FileNewProject, and choose iOSApplicationSingle View Application.
2. In the Storyboard, drop a Table View into the View Controller, but try to line up the edges before you let go.
3. From the Resolve Auto Layout Issues icon popup, choose Add Missing Constraints. Xcode doesn’t always add the constraints you have in mind, but you can use this when you’re feeling lucky.
4. Control-drag from the Table View to the View Controller and add the DataSource outlet.
5. Within ViewController.swift, add the UITableViewDataSource protocol to the class declaration. It should look something like this:
class ViewController: UIViewController, UITableViewDataSource {
}
6. Inside the ViewController class, add an array of the different video genres.
var categories = ["Action", "Drama", "Science Fiction", "Kids", "Horror"]
7. Implement numberOfSectionsInTableView so that there’s one section per genre.
func numberOfSectionsInTableView(tableView: UITableView) -> Int {
    return categories.count
}
8. Implement titleForHeaderInSection so that the section header title is simply the genre name.
func tableView(tableView: UITableView, titleForHeaderInSection section: Int) -> String? {
    return categories[section]
}
9. Implement numberOfRowsInSection so that there’s only one row per section.
func tableView(tableView: UITableView, numberOfRowsInSection section: Int) -> Int {
    return 1
}
10. Implement cellForRowAtIndexPath. Use cell as the identifier and CategoryRow as the class.
func tableView(tableView: UITableView, cellForRowAtIndexPath indexPath: NSIndexPath) -> UITableViewCell {
    let cell = tableView.dequeueReusableCellWithIdentifier("cell") as! CategoryRow
    return cell
}
Note: the compiler will complain about CategoryRow. Don’t worry, you will create this momentarily.
Your ViewController.swift file should look something like this:
import UIKit

class ViewController: UIViewController, UITableViewDataSource {
    var categories = ["Action", "Drama", "Science Fiction", "Kids", "Horror"]

    func tableView(tableView: UITableView, titleForHeaderInSection section: Int) -> String? {
        return categories[section]
    }

    func numberOfSectionsInTableView(tableView: UITableView) -> Int {
        return categories.count
    }

    func tableView(tableView: UITableView, numberOfRowsInSection section: Int) -> Int {
        return 1
    }

    func tableView(tableView: UITableView, cellForRowAtIndexPath indexPath: NSIndexPath) -> UITableViewCell {
        let cell = tableView.dequeueReusableCellWithIdentifier("cell") as! CategoryRow
        return cell
    }

}
11. Now to silence that compiler warning… Create a file (FileNewFile…) and choose iOSSource. Name the file CategoryRow and add the following code to subclass UITableViewCell:
import UIKit

class CategoryRow : UITableViewCell { }
12. One final loose end to tie up. Back in the Storyboard, add a prototype cell to the Collection View (edited) Table View. Click on the cell and set the Identifier to cell. Also set the cell class to CategoryRow.

13. Build and Run. You should see something like this:

Set Up the Collection View
The Table View Cell represents the videos within a single genre. Not only does it contain a Collection View, it also serves as its DataSource.
1. Back in the Storyboard, resize theTable View Cell to make it taller. Drop in a Collection View, and line up the constraints.

2. The Collection View already comes with a prototype cell, so set that cell’s Identifier to videoCell.

3. Now for the tricky part — wiring the Collection View’s DataSource and Delegate to the cell. It’s easier if you drag from the Collection View’s Connections Inspector to the Table View Cell within the view hierarchy.

4. To pretty things up, go to the Size Inspector of the Collection View and set the Min Spacing and Section Insets all to 5.

5. On the Attributes Inspector of the Collection View, change the Scroll Direction to horizontal.
6. Switch to the Collection View Cell and set its background color to red.
7. Within CategoryRow.swift, implement the Collection View DataSource method numberOfItemsInSection. For now, hard-code 12 videos per genre.
extension CategoryRow : UICollectionViewDataSource {

    func collectionView(collectionView: UICollectionView, numberOfItemsInSection section: Int) -> Int {
        return 12
    }

}
8. Also implement cellForItemAtIndexPath and dequeue the cell using the videoCell identifier we set in the Storyboard earlier.
func collectionView(collectionView: UICollectionView, cellForItemAtIndexPath indexPath: NSIndexPath) -> UICollectionViewCell {
    let cell = collectionView.dequeueReusableCellWithReuseIdentifier("videoCell", forIndexPath: indexPath) as! UICollectionViewCell
    return cell
}
9. Almost done! For a Table View Cell’s height, you might be used to heightForRowAtIndexPath. Collection Views use a similar method sizeForItemAtIndexPath that determines both height and width. Drop in the code snippet below to fit a handful of cells on each row at a time.
extension CategoryRow : UICollectionViewDelegateFlowLayout {

    func collectionView(collectionView: UICollectionView, layout collectionViewLayout: UICollectionViewLayout, sizeForItemAtIndexPath indexPath: NSIndexPath) -> CGSize {
        let itemsPerRow:CGFloat = 4
        let hardCodedPadding:CGFloat = 5
        let itemWidth = (collectionView.bounds.width / itemsPerRow) - hardCodedPadding
        let itemHeight = collectionView.bounds.height - (2 * hardCodedPadding)
        return CGSize(width: itemWidth, height: itemHeight)
    }

}
The width is just the Collection View width divided by four, and the height is just the Collection View height. Don’t worry about the padding adjustments — they were tweaked using trial and error. If anyone remembers their algebra from high school, I’m open to suggestions for a legitimate algorithm!
Your CategoryRow.swift file should look like this:
import UIKit

class CategoryRow : UITableViewCell { }

extension CategoryRow : UICollectionViewDataSource {

    func collectionView(collectionView: UICollectionView, numberOfItemsInSection section: Int) -> Int {
        return 12
    }

    func collectionView(collectionView: UICollectionView, cellForItemAtIndexPath indexPath: NSIndexPath) -> UICollectionViewCell {
        let cell = collectionView.dequeueReusableCellWithReuseIdentifier("videoCell", forIndexPath: indexPath) as! UICollectionViewCell
        return cell
    }

}

extension CategoryRow : UICollectionViewDelegateFlowLayout {

    func collectionView(collectionView: UICollectionView, layout collectionViewLayout: UICollectionViewLayout, sizeForItemAtIndexPath indexPath: NSIndexPath) -> CGSize {
        let itemsPerRow:CGFloat = 4
        let hardCodedPadding:CGFloat = 5
        let itemWidth = (collectionView.bounds.width / itemsPerRow) - hardCodedPadding
        let itemHeight = collectionView.bounds.height - (2 * hardCodedPadding)
        return CGSize(width: itemWidth, height: itemHeight)
    }

}
10. Build and run, and you should now have independently scrolling rows that look something like this:

More Information
A sample project of this tutorial is available on GitHub.
If you’re using Objective-C, here are some other tutorials on this topic:
- http://ashfurrow.com/blog/putting-a-uicollectionview-in-a-uitableviewcell/
- http://www.raywenderlich.com/4723/how-to-make-an-interface-with-horizontal-tables-like-the-pulse-news-app-part-2
Although Collection Views are a fundamental piece of UI, they can actually get super complicated once you start messing with the layout. If you have a subscription at Ray Wenderlich, you might find these video tutorial series to be really helpful:
Have any suggestions for future tutorial topics? Feel free to add your thoughts to the comments.
Like this post? Please share it below! Then follow us on Twitter @thorntech or join our mailing list for future updates.