Note: SFTP Gateway 2.0 Beta is now available, with high availability support preconfigured! Click here to email us to join the beta test.
A guide on how to use AWS’ Network Load Balancer to set up a highly available SFTP Gateway
A few months ago we launched SFTP Gateway, a pre-configured SFTP server that lets you easily and securely transfer files to Amazon S3. Since the launch, many users have requested that SFTP Gateway be highly available.
Currently, as a single instance, SFTP Gateway would be unavailable in the event of a failure of an AWS Availability Zone. You could create multiple instances of SFTP Gateway in separate Availability Zones, but you would need to know multiple IP addresses and test the connection to each instance. This can be extremely complicated and cumbersome to the end user.
With the announcement of a new flavor of Elastic Load Balancer named Network Load Balancer, setting up a high availability version of SFTP Gateway is now much more convenient.
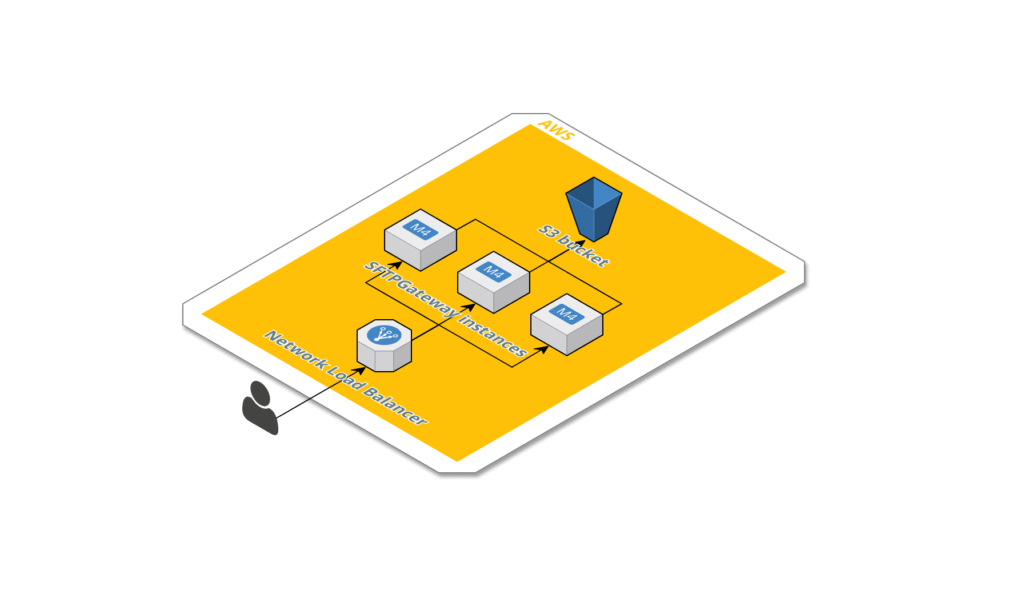
Network Load Balancer provides high throughput, low latency, and support for long-lived connections over TCP, and we can take advantage of these features by connecting SFTP Gateway to multiple EC2 instances in different availability zones to create a high availability infrastructure.
The Network Load Balancer will route logins to the different servers and provide SFTP access even if an EC2 instance or entire Availability Zone goes offline.
The Network Load Balancer is easy to set up with SFTP Gateway on existing or new infrastructures.
First, you should know about some caveats before you start the setup.
Things you should know before setting up Network Load Balancer with SFTP Gateway
Before you get started, you should be aware of some caveats. By setting up NLB with SFTP Gateway, you’ll have to do some things a little differently.
User creation is a bit different
Creating a user won’t be as straightforward as it normally is.
Currently, to create a user, all you would have to do is type `sudo addsftpuser <username>` into the command line.
With the highly available setup, you have the following options to create a user:
- You could create the user on an EC2 instance, create a new image of that instance, clone it across your subnets, and then modify your target group to remove the old instances and include the new instances.
- Or you could add the same user to each EC2 instance by copying the public key and other configuration details for that user on each instance.
Files on one SFTP Gateway instance won’t be copied to others
While SFTP Gateway allows you to store files on the SFTP server, it only moves files that are in the /uploads directory to S3. With the high availability setup, the files that exist on one particular instance will not be copied to the other instances, which would be concerning if you would like to have that non-S3 functionality.
To deal with this, you’ll have to take the following actions:
- Any configuration changes will need to be handled in a similar fashion as creating a new user so the changes will be propagated to other EC2 instances.
- If a user needs a persistent non-s3 directory, they will need to use the specific IP for a single SFTP Gateway. Using the specific IP will circumvent the Network Load Balancer.
NLB isn’t free
Network Load Balancer is not a free service, so this will add some cost to your setup.
There is an hourly charge (about $0.02 per hour depending on region) and an additional cost based on how much the Load Balancer is used.
Check out the ELB pricing for more details, and make sure to click Network Load Balancer Pricing. For SFTP Gateway Load Balancer Capacity Unit (LCU) calculations, bandwidth is probably the primary cost driver.
If these caveats are manageable, let’s move on to setting up NLB and SFTP Gateway for high availability.
Setup for Network Load Balancer and SFTP Gateway for high availability
Setting up the Highly Available SFTP Gateway involves first creating and fully configuring a single SFTP Gateway, cloning that instance, and finally creating the Network Load Balancer.

Step 1: Create and configure a single SFTP Gateway
You can skip this step if you have an existing SFTP Gateway setup.
Otherwise, subscribe to the SFTP Gateway on its Amazon Marketplace page and then create the infrastructure required for the SFTP Gateway using the instructions on the SFTP Gateway Wiki. I recommend using the CloudFormation Setup.
Next, create your users by connecting to the Gateway via SSH from the ec2-user account, and running `sudo addsftpuser <username>` . Do this for however many users you need. It won’t be as straightforward to create new users once the Network Load Balancer is setup with multiple SFTP Gateways, which is the important caveat to take into account.
Once you have setup your SFTP Gateway with users, test it out to make sure files make it to the correct destinations on S3.
Step 2: Clone the SFTP Gateway
After your SFTP Gateway is configured and users are added, it is time to clone the SFTP Gateway by creating an image of the EC2 instance. Use the following steps as a guide:
1) Navigate to the EC2 Service on AWS.
2) Click the Instances link in the left navigation to bring up the list of instances.
3) Mark the checkbox next to the SFTP Gateway instance.
4) Expand Actions at the top of the EC2 List and click on Image > Create Image.
5) Configure the image with a name like “SFTP Gateway Configured” and click Create Image (refer to Figure 2 and 3 below).


6) Navigate to the Images>AMIs link on the left navigation. You should see your new image with a pending status. Proceed to the next step when it has a status of available.
7) Mark the checkbox next to the new image, and click the Launch button at the top of the list.
8) Configure the new instance with your preferences and set it to run in a different availability zone than the previous instance.
9) Repeat steps 6 through 8 as many times as you’d like to create a more highly available infrastructure.
Step 3: Create the Network Load Balancer
The last step is to create the Network Load Balancer and configure it to use the SFTP Gateway instances created in Step 2. Use the following steps as a guide:
1) Navigate to the EC2 Service on AWS.
2) Click the Load Balancing>Load Balancers link on the left navigation.
3) Click Create Load Balancer at the top of the Load Balancer list.
4) Click Create in the “Network Load Balancer” card.
5) Set a name for the Load Balancer, leave the Scheme as internet-facing (refer to figure 4).
6) Set the Listener Load Balancer Port to 22, which is the port SFTP uses (refer to figure 4).
7) Select at least the Availability Zones where you created the SFTP Gateway instances in Step 2: Clone the SFTP Gateway (refer to figure 4).

8) Click Next: Configure Routing.
9) Set a name for the new target group (refer to figure 5).
10) Set the Port to 22, leave the protocol as TCP and the target type as instance (refer to figure 5).

11) Click Next: Register Targets.
12) Select the Instances that will be load balanced in the bottom Instances list (refer to figure 6).

13) Click Add to registered and the instances will appear in the top Registered targets list (refer to figure 7).

14) Click Next: Review.
15) If there are no errors, click Create. The list of load balancers will now show with the new load balancer showing a state of provisioning. It could take up to 10 minutes for the state to switch to active. Proceed to the next step when the state is active.
Use the DNS name in your SFTP client to test out the highly available SFTP Gateway!
Conclusion
High availability has been a frequently requested feature, and the launch of Network Load Balancer has made the setup of a highly-available SFTP Gateway more convenient.
We hope that this tutorial was helpful in guiding you to set up a highly available SFTP Gateway. If you have any issues, please write a comment on this post and we’ll get back to you soon.
We hoped you liked this post! If you did, please share it using the share buttons to the left. Then join our mailing list below, follow us on Twitter @thorntech, and join our Facebook page for future updates.